
I would reject an infill site if long trailers can’t enter, park, and leave safely - even if demand looks strong. Before buying, I’d confirm zoning, legal access, and the rentable stall count, then test the budget against lower rents and a 5% to 15% loss of usable area.
Here’s what I’d check:
- Demand: Customer drive times, towing routes, competing spaces, rents, and seasonal occupancy.
- Access and capacity: A scaled layout and swept-path check for the largest planned rig, with setbacks, drainage, gates, and turning space included.
- Visibility and nearby uses: Entrance sight lines, sign rules, lighting, traffic conflicts, and effects on neighbors.
- Approvals and costs: Written use confirmation, fire access, title, utilities, sitework, and required road improvements.
- The buying decision: A 100-point scorecard, at least 70 points, no fatal flaws, and returns that still work under weaker assumptions.
My rule: score only sites that pass the hard checks. <u>Resolve every open due diligence item before removing contingencies</u>, then advance, renegotiate, investigate further, or reject.
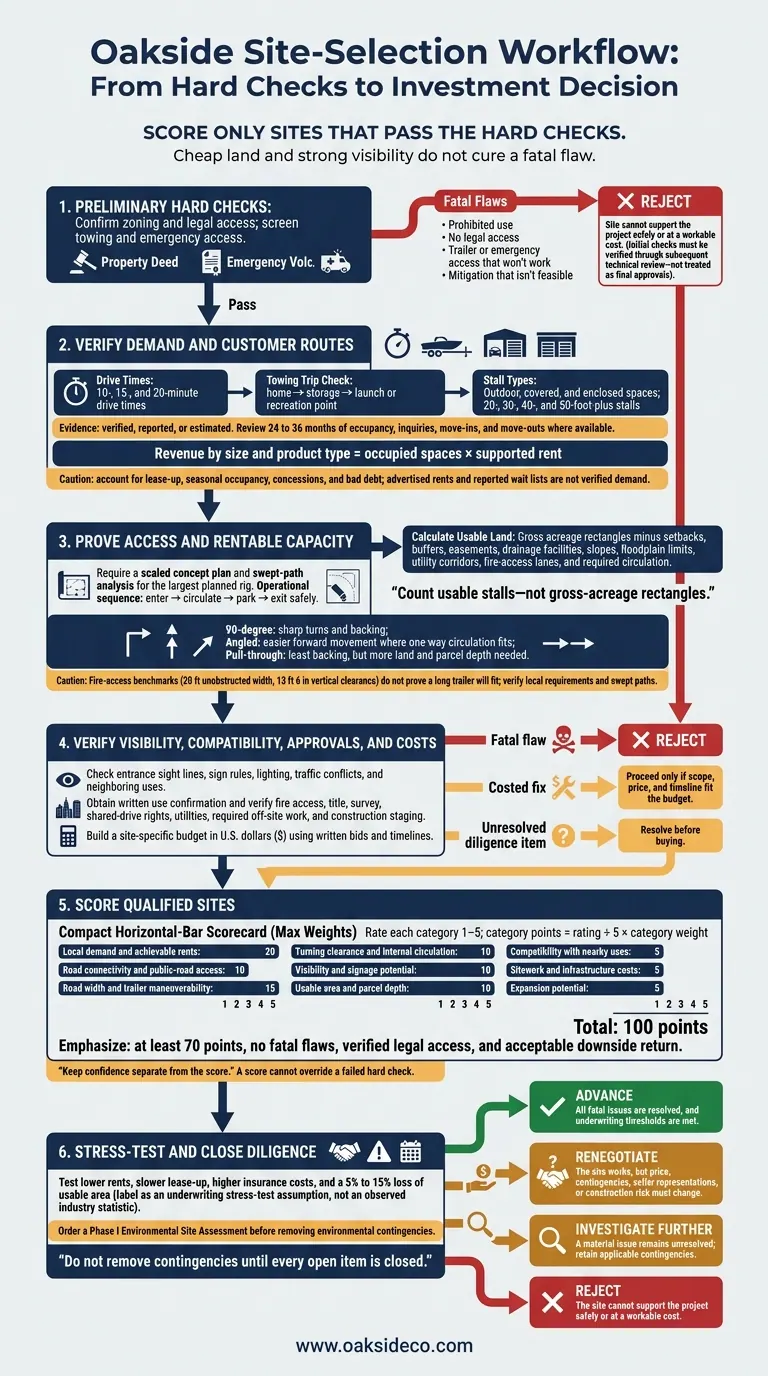
Boat and RV Storage Infill Site Decision Guide
Once zoning and basic access checks are complete, test whether the surrounding trade area can support the site.
Map Customer Drive Times and Towing Routes
Map 10-, 15-, and 20-minute drive times, then overlay income, vehicle ownership, tenure, and housing growth. Check local vehicle registrations where available, along with HOA rules and municipal parking restrictions. If the area supports the concept, check whether customers can safely tow their vehicles to the site.
Test routes with the largest rig you plan to accommodate:
Test the largest planned rig, such as a 40-foot motorhome with a towed car or a long fifth-wheel trailer.
Trace the entire trip: home to storage, then storage to the intended launch or recreation point. Use traffic counts and field observations to compare weekday, weekend, and peak-season travel times. Check bridge clearances, weight limits, rail crossings, grades, and restricted turns. Reject sites with cumbersome or unsafe towing routes.
Once the routes pass these checks, compare local demand with competing supply and rents.
Verify Demand, Supply, and Monthly Rents
Inventory outdoor, covered, and enclosed spaces with 20-, 30-, 40-, and 50-foot-plus stalls. Focus on lengths the parcel can physically support. For each stall size, record rents, vacancies, access hours, amenities, deposits, and concessions.
Ask local marinas, RV dealers, boat dealers, repair shops, and campgrounds which vehicle sizes and storage types customers need. Review planning agendas, permits, and applications for new supply along the same routes.
Label every data point verified, reported, or estimated. An advertised rate isn't a leased rate, and a reported wait list doesn't confirm demand. Where available, review rent rolls, signed reservations, and 24 to 36 months of occupancy, inquiries, move-ins, and move-outs. These records help separate year-round demand from seasonal peaks and test whether customers will pay more for covered or enclosed spaces.
Calculate revenue by size and product type: occupied spaces × supported rent. Account for lease-up, seasonal occupancy, concessions, and bad-debt allowances. Don't assume the property will reach stabilized occupancy immediately.
Once you’ve confirmed demand, check whether the site can handle the largest rigs you expect to store.
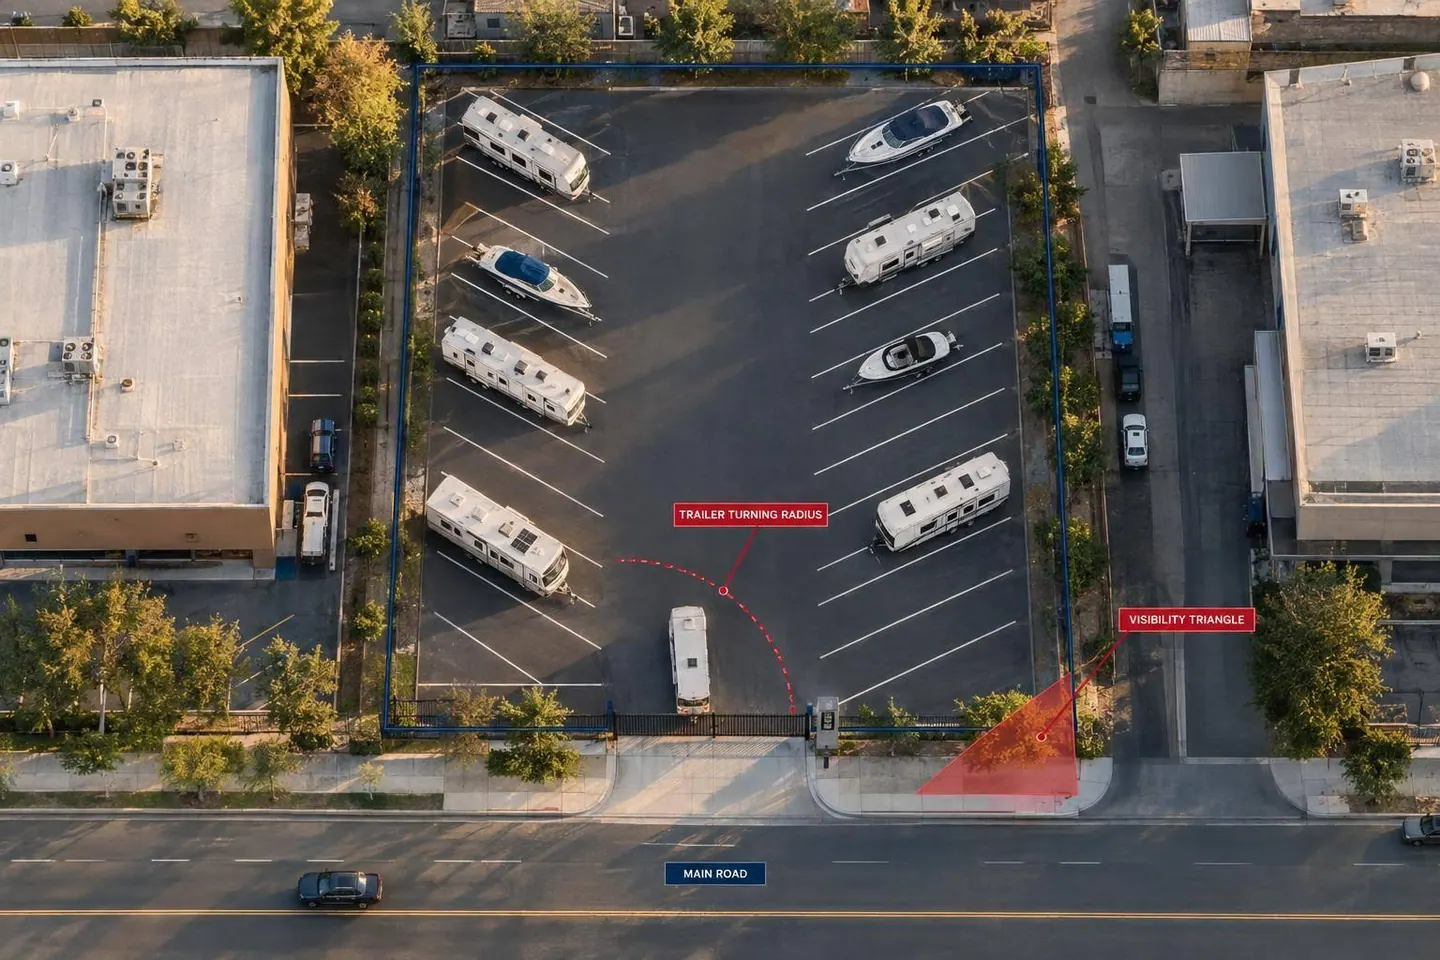
Treat large-vehicle access as a pass/fail test. Require a scaled concept plan and swept-path analysis based on the largest expected RV and boat-and-trailer rig - not passenger-car dimensions. Have a civil engineer or transportation consultant verify that vehicles can enter, circulate, park, and exit without mounting curbs, crossing into opposing traffic, or backing into public streets.
Check Road Width, Turning Radius, and Gates
Where approaches are tight, measure clear road width, shoulders, curb radii, grades, and overhead clearance. Confirm weight limits, too. The swept-path plan should show axle paths, off-tracking, overhang, and mirror clearance at the entrance and throughout the site.
Aisle width and turning radius depend on vehicle size, stall layout, and local standards. Allow room for vehicles to pass each other where needed. Fire-access benchmarks of 20 feet of unobstructed width and 13 feet 6 inches of vertical clearance are separate requirements. Meeting them doesn’t prove a long trailer will fit.
Show the gate setback and opening width in feet, plus keypad placement and the gate’s swing or slide path. Check that the entire rig can wait on-site without blocking sidewalks, neighboring driveways, or fire lanes. Wherever you plan two-way access, test entry and exit at the same time. Even a wide gate can fail if its alignment forces a sharp corrective turn.
If the approach works, check parcel depth and stall layout next.
Measure Parcel Depth and Usable Land
Use a current survey to measure frontage and depth in feet. To find the land available for rentable stalls, subtract setbacks, buffers, easements, drainage facilities, slopes, floodplain limits, utility corridors, fire-access lanes, and required circulation.
Label stalls, aisles, turning areas, gates, landscaping, utilities, and expansion space on the test fit. A shallow parcel may not have room for pull-through stalls. Limited frontage may leave too little space for an entrance and queue. Count usable stalls - not rectangles drawn across gross acreage.
Compare Parking Layouts
Once you know the usable area, compare layouts that fit the parcel. Check clearance with neighboring stalls occupied.
| Layout | Aisle-width needs | Maneuverability | Land efficiency | Fit for long trailers |
|---|---|---|---|---|
| 90-degree | Greatest demand for aisle width and turning clearance | Sharp turns and backing | Calculate stall density only after allowing for wide aisles | Accept only if the rig fits without excessive backing or conflicts |
| Angled | Narrower aisles where one-way circulation fits | Easier forward movement | Check frontage needs and unused edge areas | Useful for mixed boat and RV inventory if stall depth and aisle direction work |
| Pull-through | Needs depth and turning space at both ends or a continuous loop | Least backing | More land per stall | Accept only where parcel depth supports it |
Before accepting the stall count, run separate swept-path checks for difficult stall entries and end-of-aisle turns.
Check Entrance Visibility and Sign Rules
Inspect every approach during the day and at night. Record road speed, grade, curves, vegetation, structures, parked vehicles, utility poles, signs, and seasonal obstructions. Measure both intersection sight distance and stopping sight distance. A site can pass one and fail the other. FHWA’s screening references for 40 mph are 445 feet to the left and 385 feet to the right, but follow the applicable state or local standard.
Before counting on roadside exposure, confirm permitted driveway locations, turning restrictions, and sign rules for size, height, setback, and illumination. Keep signs and landscaping out of sight triangles.
At night, check whether drivers towing trailers can identify the entrance, gate, pavement edge, address, and directional signs without glare. Lighting should illuminate the entrance and pedestrian paths without glare. Good visibility won’t solve a tight driveway or poor emergency access.
Check Compatibility With Nearby Uses
If the entrance works, check whether nearby uses support approvals and day-to-day operations.
Review adjacent zoning, current uses, and future land-use plans. Map customer movements alongside loading traffic, shared drives, sidewalks, crossings, bus stops, bicycle facilities, and driveway sight triangles. Check where headlights shine into homes. Also identify where engines, gate motors, washing, pressure washing, loading, customer conversations, or early-morning departures could disturb neighbors.
| Nearby use | Customer benefit | Approval risk | Access conflicts | Typical fixes |
|---|---|---|---|---|
| Industrial or commercial edge | Truck-oriented access and convenient arterial routes | Low to moderate, depending on zoning and site-design rules | Shared drives, loading traffic, forklifts, and peak commercial movements | Durable fencing, controlled lighting, marked circulation, and shared-access coordination |
| Residential boundary | Close to customers | Moderate to high: hearings, screening rules, and opposition | Trailer movements, headlights, early departures, and queuing near homes | Solid fencing, landscape buffers, downward-shielded lighting, noise controls, and restricted hours |
| Recreational area, marina, or campground | Potential cross-referrals and shorter towing routes | Moderate: environmental, floodplain, park, or seasonal-use controls | Weekend congestion, pedestrians, bicycles, boat ramps, and event traffic | Separate trailer circulation, pedestrian protection, directional signs, and event-day traffic management |
| Pedestrian-heavy commercial corridor | High visibility and customer awareness | Moderate to high: frontage, access, streetscape, and safety requirements | Pedestrians, bicycles, curb activity, and turning conflicts | Limited or consolidated access, controlled crossings, lighting, low-speed design, and frontage screening |
Verify Zoning and Development Costs
Once nearby uses check out, confirm that the proposed use can get approval and stay within budget.
Get written planning confirmation for each use: enclosed, covered, uncovered, washing, repairs, electrical service, fuel, and propane handling. Confirm screening and drainage requirements, site-plan review, and timing. Submit the concept plan to fire officials to review emergency access and fuel-handling restrictions.
Before removing contingencies, verify the title commitment, survey, legal access, shared-drive rights, utility capacity, planned road projects, required off-site work, and construction staging.
Build a site-specific budget in U.S. dollars ($) covering acquisition, sitework, permits, access improvements, mitigation, and contingency. Get written bids and timelines instead of relying on rough per-acre allowances. Classify each item as a fatal flaw, costed fix, or unresolved diligence item:
- Fatal flaw: Prohibited use, no legal access, trailer or emergency access that won’t work, or mitigation that isn’t feasible. Reject the site.
- Costed fix: A documented scope, price, and timeline. Move forward only if the fix fits the budget.
- Unresolved diligence item: A pending agency decision, title issue, or capacity confirmation. Resolve it before buying.
Build a Weighted Site Scorecard
Once parcels pass the drive-time, access, depth, visibility, zoning, and nearby-use checks, compare them using one weighted scorecard. Keep fatal-flaw tests separate from the score.
Use the 100-point allocation below. Rate each category from 1 to 5, then calculate its points as rating ÷ 5 × category weight. Check the entire towing route and internal circulation - not just the entrance. Weigh market evidence alongside physical limits and regulatory requirements.
| Category | Maximum points |
|---|---|
| Local demand and achievable rents | 20 |
| Road connectivity and public-road access | 10 |
| Road width and trailer maneuverability | 15 |
| Turning clearance and internal circulation | 10 |
| Visibility and signage potential | 10 |
| Usable area and parcel depth | 10 |
| Zoning and approval certainty | 10 |
| Compatibility with nearby uses | 5 |
| Sitework and infrastructure costs | 5 |
| Expansion potential | 5 |
For every rating, record the source, date, confidence level, unresolved issue, mitigation, and cost. Keep confidence separate from the score. A concept plan is not a substitute for a verified swept-path plan.
Set the threshold for moving forward before scoring: no fatal flaws, at least 70 points, verified legal access, and an acceptable downside return. Use the score to compare qualified sites, then confirm the assumptions through due diligence.
Resolve Open Items Before Buying
Build one approved underwriting case around the verified stall count, achievable rents, confirmed approval path, and current development cost estimate. Test lower rents, slower lease-up, higher insurance costs, and a 5% to 15% loss of usable area.
For every disagreement, log the evidence needed, responsible person, deadline, dollar impact, and effect on the decision. Keep reports, assumptions, agency correspondence, cost estimates, and approvals in one deal file. That makes the decision easier to audit and update if terms change.
Have the relevant specialists verify any open items. Order a Phase I Environmental Site Assessment before removing environmental contingencies. Do not remove contingencies until every open item is closed.
After scoring the site, base the buy/not-buy decision on the whole package - not one strong point. Advance only if the site passes operational, legal, and financial tests together. Evaluate buildable area, not gross acreage.
Use the scorecard and due diligence findings to choose one of four actions:
- Advance - all fatal issues are resolved, and underwriting thresholds are met. This includes performing a sensitivity analysis to ensure the project remains viable under changing market conditions.
- Renegotiate - the site works, but the price, contingencies, seller representations, or construction risk must change.
- Investigate further - a material issue remains unresolved.
- Reject - the site cannot support the project safely or at a workable cost.
Put the recommendation in the investment memo. Log the issue, owner, required evidence, deadline, financial impact, and closing status. Cheap land and strong visibility do not cure a fatal flaw.
How small can a boat and RV storage site be?
There’s no fixed minimum site size, but projects typically need 7 to 10 acres to be viable and give 45-foot rigs enough room to maneuver. Zoning, setbacks, and drainage often limit buildable coverage to 35%–40%. That makes it harder for smaller sites to fit wide drive aisles and allow enough room for large turns.
Nolen Masserman, Managing Director at Oakside, notes that layouts must match local demand to support occupancy and protect value.
Can access improvements make a tight infill site viable?
Yes. Modern rigs need plenty of room to maneuver, so limited circulation can make a tight infill site less usable. **Broader drive aisles - ideally 50 to 60 feet for 90-degree parking - **one-way loops, or pull-through access can make room for larger vehicles and make the site more appealing. Using data helps owners decide which access and signage improvements to prioritize to support measurable growth.
How do I choose the most profitable stall mix?
Don’t rely on overall occupancy alone. Calculate revenue per available square foot (RevPAF) for each unit type to spot underperforming spaces. Occupancy above 90% may be a chance to increase rates. Below 85%, consider short-term promotions or reconfigure the space to better match local demand.
Compare your stall mix with market needs within a 3- to 5-mile radius to check whether you’re offering what local customers need.